Monday, August 13, 2012

My new love of spray paint!

I am in LOVE with this project, it looks awesome and was so easy and fast!!
I recently up-cycled/re-did these two metal and wicker racks that we have had for about five years. They are from Hobby Lobby and they were an antiqued silver color with wood wicker and antiqued gold accents. They weren’t too bad and they matched our old house’s décor and colors. Since moving into this new house I wanted to make them stand out more and spruce them up.

Here is what they looked like before:

Enter in my new love of spray paint:
 I used Rust-Oleum Hammered Spray Paint in Brown. We bought two cans of it for both racks and I still have some left, I have another project it is perfect for.
We wiped down the racks really well with a damp cloth to get any dust or debris off. Then we sprayed the racks and let them dry, it is fun watching the hammered effect work while it dries. They dry fairly quickly but we left them in the garage for about an hour and a half and then brought them back in the kitchen.

 I placed some of my nice platters, a clock and my milk glass vases I found at an antique store on the big rack and centered that on the kitchen wall. I placed my cookbook stand and this awesome cookbook for newlyweds that we got from my Aunt and Uncle at our wedding on the little rack and put it in the corner up against the cabinets. I love displaying this cookbook because it has a nice little note on the inside.


I love how the hammered look turned out and they look great against the light wall and our table. I have some other ideas/projects that I am going to add to this wall as well. I’ll have those projects soon, just need to get more spray paint!!


Sunday, July 29, 2012

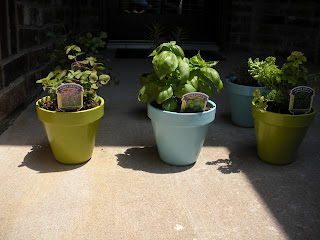
Colorful Herb Garden

I was so happy to be outside and “playing” in the dirt this past weekend! I forgot how much I missed doing yard work since we sold our house. I needed a new herb garden since we “killed” ours when we moved.  Here is a link to the post that I did last year on my herb garden. I loved it and got a lot of use out of it but I wanted to do something different this year. Since we have such a big back porch, I decided to plant the herbs in separate pots rather than one big one.

 (Please ignore the moving sticking on our table! I always find those months later!! :))
Here is what you will need:
6- 6” Terra cotta pots
Primer
Sponge Brush
Spray paint (your choice of color(s))
Clear Gloss spray paint
Assorted Herbs
Potting Soil
This is an easy and inexpensive project. I bought inexpensive 6” terra cotta pots at Wal-Mart for less than $2 a piece. I also picked up some spray paint in Ivy Leaf and Blue Ocean Breeze (Krylon brand) at just under $4 a can. I also recommend getting the clear gloss spray paint because it will help to protect your colored spray paint and give it a good gloss, this was also under $4 a can. Now you can buy already painted pots but they can get pretty pricey and I always have a hard time finding the right color. The primer I already had so that was helpful and thrifty! Herb plants and potting soil are fairly inexpensive and if you factor in how much it will save you in your grocery bill this is well worth it in my opinion.
Okay now to the fun part, PAINTING!!! First paint your pots with your primer, you can but spray primer but I already had primer leftover from my table project. I used Zinsser Bulls Eye primer and a cheap foam brush. The pots do soak up a lot of the primer but this makes you use less of your spray paint to fully coat them. I did one coat on the pots and let them fully dry.

Once they were dry I began spray painting them, 3 in the Ivy Green (a lime green) and 3 in the Blue Ocean Breeze (a light aqua). I picked these colors because they go well with my outdoor décor, the hammock and chair covers.


Let them dry for a least an hour and then spray a second coat. Be sure to spray at a good distance so that you don’t get drip marks. Let them dry for another hour and then spray them with a good coat of the clear gloss spray paint to seal it all in. Ta-da, pretty colored pots on the cheap!! Plus now you have extra spray paint for future projects, we all know I have a ton of future projects!! :)  

Once the clear gloss top coat has dried you can begin planting your herbs. I planted basil, thyme, oregano, parsley, cilantro and rosemary.  Place a little potting soil in the bottom of each pot, enough to cover the bottom and give a little height to your herb. Move each herb out of the plastic pot and place it in its individual new pot. Fill each pot with potting soil, be sure to cover all sides and smooth the top out. Don’t forget to add your name tag from each herb to its corresponding pot so you don’t mix any up. I may make cuter little signs later but I haven’t found quite what I am looking for yet.

I placed my pots on our outdoor patio table for now but I am convincing my hubby to build a cute shelf unit for me. I have the design in my head I just need to put it on paper. 

Happy Planting!!


Tuesday, July 24, 2012

I Like Big Books... Tote Bag

I love this new tote bag I made!!!! I recently bought a Silhouette Cameo, seriously this is the most awesome crafting machine!!! It an cut paper, vinyl, heat transfer and much more. Plus instead of paying $80 a cartridge for a few designs you buy each design individually for .99 cents. So much more practical! OK, back to my tote bag.

I have seen these cute bags all over Pinterest with the saying "I like Big Books and I cannot lie." I think it is so fun and very 90's.

All you need is an inexpensive plain tote bag from a craft store and some heat transfer material. I wrote out my saying in the Silhouette studio software with the Wide Latin font, right aligned. I made the Big Books part a little bit bigger and all caps so it stood out. Load your machine with the heat transfer paper with the glossy side down. When using the heat transfer material make sure you reverse the image before you send it to the Silhouette Cameo. Once the material has been cut by the Cameo, you can remove the clear backing and place on your tote bag right side up. Have your iron on the highest setting and use a sheet or pillowcase in between your iron and the material. Iron over the design a few times until it is sticking in all corners. Peel back the clear part and your done! Now I have an awesome book tote, that represents me!!
Linking up to:

Wednesday, July 18, 2012

Homemade Gift Exchange June 2012

I recently participated in an online Handmade Gift Exchange hosted by Linda at Craftaholics Anonymous! It was a lot of fun.


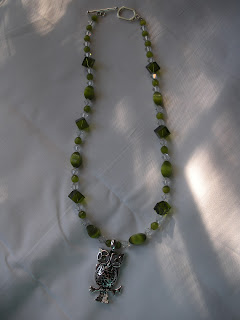
You make a handmade gift for a person you 'draw' and someone else makes a gift for you. Your person could be anywhere, it is like crafty pen pals! You can ask questions anonymously to get a feel for what they may like. I got Madison and she liked the owl trend and told me some of her favorite colors too. I decided to make an owl necklace.


It came out really cute and she said she loved it. In return I received a cute apron from Susan. She asked if I collect anything and the only thing I really collect is aprons. Here is a picture of my lovely handmade gift.


Linda at Craftaholics Anonymous hosts this twice a year and I plan on doing this again in November for the next one. If you are interested you can sign up for a reminder e-mail here.

Saturday, June 2, 2012

Breakfast Nook Table Re-do

I am so excited to share with you our first big furniture painting project! When we moved into this house two months ago we realized that we needed to buy a small dining table for our breakfast nook area. I was so excited that this house had a separate formal dining area because I love my dining table and like to show it off. Yeah for me!!

OK, back to the project at hand. We could have bought a simple table and chairs set from Target or a furniture store but I didn’t want to spend a lot of money because depending on when and where we move again we may not use it at the next house. So I wanted to check out a local furniture consignment shop. I am glad I did!!
We found this simple table with four chairs for $179!! That is so cheap. It had a few minor scuffs and scratches but I didn’t care because I knew I wanted to paint it to blend with our kitchen cabinets. While we were in there we looked around at the other stuff and I found this great mirror for $8.

$8, SOLD!!!
I loved the shape of the frame and it was in great shape.  I had been looking for a great shaped frame for my Menu chalkboard for months with no luck and then I found this one for pennies basically. That will be a later blog post! OK, I am side-tracking, back to the table.
So like I said I wanted to paint it a warm white to blend with our kitchen cabinets and keep the space light and fresh looking. I chose the color String of Pearls from Valspar. It isn’t an exact match to the cabinets but we wanted it to blend without being too matchy-matchy.
Here are the supplies needed:
Paint (I used Valspar Eggshell finish in String of Pearls)
Primer (I used Zinsser Bulls Eye)
Polycrylic (I used Minwax)
Paint brush or roller (I used a paint brush because of all the corners and crevices with the chairs)
Sand paper (I used light and medium grit)

I don’t have a great before picture because we took the thing apart to get it home and then we got right to working on it. You can at least see the color of the wood in this photo.

First we sanded each piece. Since you are using primer you don’t have to sane too much unless there are a lot of scratches and ding marks. We were lucky ours didn’t have many. Wipe each piece with a damp clean rag or paper towel to remove the dust.  Now you can start priming, we did 2 coats of primer since the wood was a dark color and we were painting it white. Be sure to let each coat dry before applying the next.

Once primed go through and lightly sand out any drip marks and wipe clean. Now you can begin painting, again we did 2 coats of paint as well for good coverage.  Let dry in between coats of paint.
Lastly, we added a coat of polycrylic to help seal and protect our hard work; it also adds a light gloss. You can do more than one coat of this if needed. Once everything was dry we put it back together and placed it in the nook area.
I love how it turned out!! It is perfect since it is just us two most of the time and now we don’t have an empty space. It amazes me what paint can do!!

Linking to:

TDC Before and After

Monday, May 7, 2012

Grilled Pesto Pizza


I was brave this weekend and tried grilling pizza for the first time. I had heard so many great things about grilled pizza but was afraid to try it. In my head I saw a huge gooey mess happening on the grill and so did my hubby, but luckily for us no such thing happened. It was amazing and really very easy.

 For the whole wheat pizza dough:
Ingredients:
2 ½ cups whole wheat flour
1 cup unbleached, all purpose flour
2 pkgs. dry active yeast
1 tsp. salt
½ tsp. Splenda or sugar
1 ½ cups lukewarm water
½ tsp. olive oil
Flour for work surface
Extra olive oil for baking sheet (to hold the dough while the grill heats up)

Place whole wheat flour, all purpose flour, yeast, salt and Splenda in a mixer fitted with a dough hook. While mixer is running gradually add water and knead on low speed until dough is firm and smooth, about 10 minutes. Turn machine off and pour the olive oil down inside the bowl. Turn on low once more for 15 seconds to coat the inside of the bowl and all surfaces of dough with oil. Cover the bowl with plastic wrap and set in a warm spot until doubled in volume, about 2 hours.


After your dough has doubled in volume, punch down dough and cut in half. On a generously floured surface place one half of the dough. By hand, form dough loosely into a ball, stretch into a circle. Using a floured rolling pin, roll out dough until desired size and thickness. Keep in mind your grill size as well. Take a large baking pan and brush it with olive oil, place the rolled out dough on the pan. Do the same for your other half of the dough. Set aside until your grill is ready.
For the pesto:
Ingredients:
2 cups of fresh basil
½ cup grated Romano cheese
½ cup olive oil
1/3 cup walnuts
3 med cloves of garlic, minced

Place basil and walnuts in a food processor, pulse a few times (I used a mini food prep chopper/processor). Add the garlic and pulse some more. Add in the olive oil a little at a time and pulse. Stop and scrape the bowl, add the cheese and pulse again until everything is incorporated. Move into a small bowl to take out to the grill.

Other toppings:
2 cups of shredded cheese (I used 5 blend Italian cheese)
Crushed red pepper flakes
I kept my pizza simple but you can add fresh tomatoes or chicken, be creative.

For the grill we used our charcoal side, place the coals on only half of the grill. This will keep your dough from getting too crisp while you add your toppings.  Let your coals get hot, about 20 minutes depending on your grill. Now take your pan out to the grill. Using a grill spatula, place your dough on the charcoal filled half of the grill. Let it cook for 3-4 minutes, you will see it bubble up a little bit. Flip the dough over and cook for 3-4 minutes more.
If you want it more ‘grilled’ you can flip it again. Now move your dough over to the half of the grill that doesn’t have the coals under it. Spread your pesto sauce on the dough, top with cheese. Let it sit on that side of the grill for a few minutes for the cheese to melt. You can shut the grill but keep a close eye on it so it doesn’t burn. Once the cheese is melted, you are ready to serve. Repeat with other pizza dough. I topped mine with red pepper flakes.

Incredibly delicious!! Enjoy!!

Friday, May 4, 2012

Shrimp Alfredo Lasagna

Have I got a yummy recipe for you guys today!! This past weekend I wanted to make something different but I really was craving lasagna for some reason. So I made my own version of Shrimp Alfredo Lasagna.


It is simple to make and extremely delicious. Side note: I prefer glass baking dishes for lasagna so,  I used a 10” X 15” dish and there were lots of leftovers!! Here is the recipe:
Ingredients:
1 box lasagna noodles
1 (15 oz) container of ricotta cheese (I use low fat)
1 (16 oz) container of cottage cheese (I use low fat)
1 ½ Tbsp. Italian seasoning
2 cups shredded mozzarella cheese
1 ½ cups freshly grated parmesan cheese (divided)
1 Tbsp. butter or margarine
25-30 small/medium uncooked tail off peeled shrimp
3-4 cloves of garlic minced
½ tsp. salt
½ tsp. cayenne pepper (I use more than this (about 1 tsp.) because I like the zippiness)
4 Tbsp. flour
2 cups half & half (I use fat-free)
 
Directions:
Mix the cottage cheese and ricotta cheese together in a bowl, add in the Italian seasoning and mix again, set aside. Mix your mozzarella cheese with 1 cup of your grated parmesan cheese, set aside.
Cook your lasagna noodles according to package directions. Once they are done, drain them and toss them with cold water to reduce sticking and to cool them down to be able to assemble the lasagna.
Meanwhile, place your butter, garlic, salt and cayenne pepper in a good size fry pan and blend together. Add your shrimp and sauté until nice and pink. Add the flour and stir until well incorporated into your shrimp mixture. Slowly add your half & half and the remaining ½ cup of grated parmesan cheese. Stir and then turn burner on high until the sauce begins to boil, stirring constantly. Cook and stir for 2-3 minutes or until thickened. Once thickened, remove from heat.
Now you are ready to assemble the lasagna. First take a little of the Alfredo sauce (try to keep the shrimp out on this thin layer) and spread it on the bottom of your pan, this keeps the first layer of noodles from sticking and getting crispy. Next layer your noodles on top of the thin sauce layer. Be sure to evenly cover the bottom of the pan. Now add a few big dollops of the cottage/ricotta cheese mixture and spread out evenly on the noodles. Add a couple of spoonfuls of your Alfredo sauce mixture on top on the cottage/ricotta cheese mixture. Sprinkle some of the mozzarella/parmesan mixture next. Now continue with this order until you are out of room or until you use up all the ingredients.
Cover your pan with foil and place in a preheated oven to 350 degrees. Cook for 30 minutes and then remove the foil and place back in the oven for 5-7 more minutes so the cheese can brown on top. Serve with a salad and some garlic bread and you have a unique and delicious meal!
Enjoy!
Linking to: