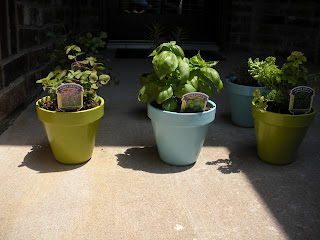
I was so happy to be outside and “playing” in the dirt this
past weekend! I forgot how much I missed doing yard work since we sold our
house. I needed a new herb garden since we “killed” ours when we moved. Here is a link to the post that I did last
year on my herb garden. I loved it and got a lot of use out of it but I wanted
to do something different this year. Since we have such a big back porch, I
decided to plant the herbs in separate pots rather than one big one.
Here is what you will need:
6- 6” Terra cotta pots
Primer
Sponge Brush
Spray paint (your choice of color(s))
Clear Gloss spray paint
Assorted Herbs
Potting Soil
This is an easy and inexpensive project. I bought
inexpensive 6” terra cotta pots at Wal-Mart for less than $2 a piece. I also
picked up some spray paint in Ivy Leaf and Blue Ocean Breeze (Krylon brand) at just under $4 a
can. I also recommend getting the clear gloss spray paint because it will help
to protect your colored spray paint and give it a good gloss, this was also
under $4 a can. Now you can buy already painted pots but they can get pretty
pricey and I always have a hard time finding the right color. The primer I
already had so that was helpful and thrifty! Herb plants and potting soil are
fairly inexpensive and if you factor in how much it will save you in your
grocery bill this is well worth it in my opinion.
Okay now to the fun part, PAINTING!!! First paint your pots
with your primer, you can but spray primer but I already had primer leftover
from my table project. I used Zinsser Bulls Eye primer and a cheap foam brush.
The pots do soak up a lot of the primer but this makes you use less of your
spray paint to fully coat them. I did one coat on the pots and let them fully
dry.
Once they were dry I began spray painting them, 3 in the Ivy
Green (a lime green) and 3 in the Blue Ocean Breeze (a light aqua). I picked
these colors because they go well with my outdoor décor, the hammock and chair
covers.
Let them dry for a least an hour and then spray a second
coat. Be sure to spray at a good distance so that you don’t get drip marks. Let
them dry for another hour and then spray them with a good coat of the clear
gloss spray paint to seal it all in. Ta-da, pretty colored pots on the cheap!!
Plus now you have extra spray paint for future projects, we all know I have a ton of future projects!! :)
Once the clear gloss top coat has dried you can begin
planting your herbs. I planted basil, thyme, oregano, parsley, cilantro and
rosemary. Place a little potting soil in
the bottom of each pot, enough to cover the bottom and give a little height to your
herb. Move each herb out of the plastic pot and place it in its individual new
pot. Fill each pot with potting soil, be sure to cover all sides and smooth the
top out. Don’t forget to add your name tag from each herb to its corresponding
pot so you don’t mix any up. I may make cuter little signs later but I haven’t
found quite what I am looking for yet.
I placed my pots on our outdoor patio table for now but I am
convincing my hubby to build a cute shelf unit for me. I have the design in my
head I just need to put it on paper.
Happy Planting!!


Love the color, it's so pretty!
ReplyDeleteTitanium Coating provides excellent base paper coverage. This is because spray application spreads the coating agent evenly over the paper surface, uniformly covering uneven areas of the base paper with an even coating layer of the desired thickness.
ReplyDelete